
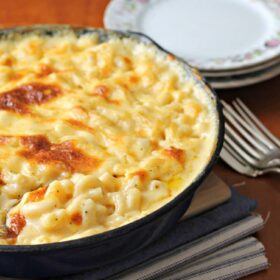
Baked Macaroni and Cheese
Baked macaroni and cheese doesn’t have to be complicated with layers of ingredients to be the soul-warming food you crave. This homemade baked macaroni and cheese is my most favorite and has pleased crowds, small families, kids and picky eaters alike–give it a try and you’ll see why.
Jump to Recipe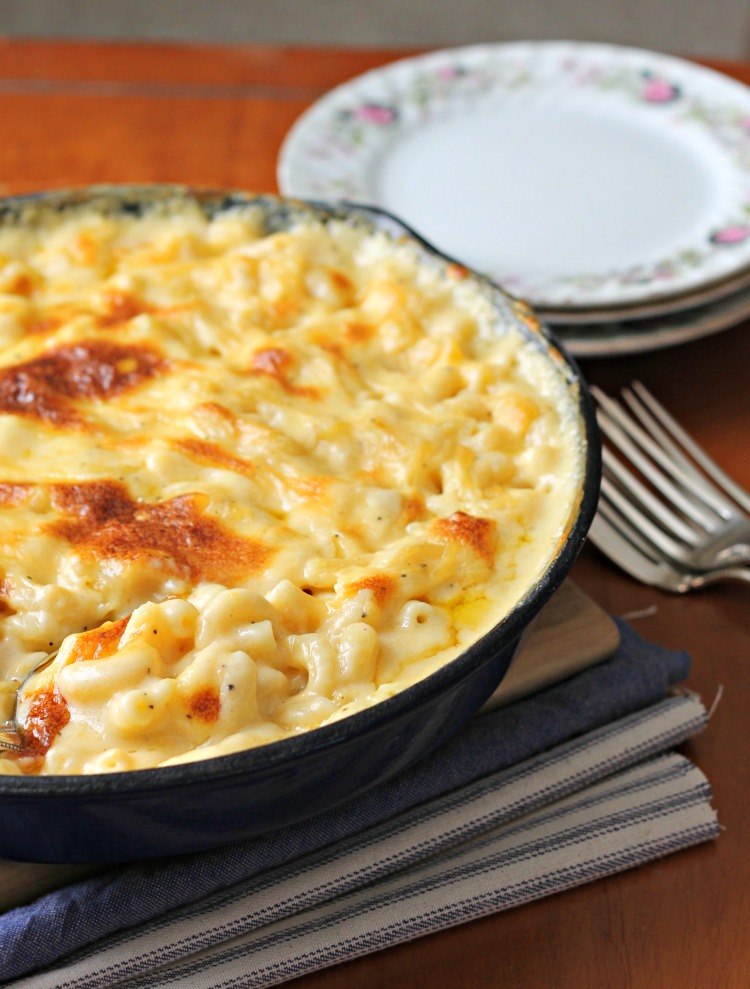
Key Takeaways
- Stir constantly so the sauce doesn’t split and keep the heat down low.
- Use strong flavored cheeses like Swiss and sharp cheddar grated from a block and never bagged pre-shredded.
- Make sure to taste the sauce before baking and adjust with more salt or a dash of red wine vinegar to your preference.
- You can make this mac and cheese up to three days in advance and bake it later.
- It will get dry and mushy in a slow cooker. I don’t recommend one.
- Prep and bake later: Just let it cool down, put some plastic wrap right against the surface of the mac and cheese (to keep it from forming a skin) and stick it in the fridge. When ready to bake, cook until the edges are bubbling and the center is warm.
- To freeze: Can’t freeze it.
Other tips:
- Never stop stirring your milk once it hits the pan. If your skillet is too hot or you walk away and for a minute you could scorch the white sauce and it will curdle. It doesn’t really hurt the taste, but it will look sort of clumpy. Some readers have called it “grainy”. It only takes 5 minutes. Just hang out and stir until that sauce is thick enough to coat the back of your spoon.
- Use good cheese in your baked macaroni and cheese. That means avoiding bagged, pre-shredded cheeses because they contain cellulose (an anti-caking agent) that can cause your cheese not to melt as it should.
- Try to choose a melting cheese and a flavor cheese for the best flavor and texture in your baked macaroni and cheese. Sharp cheddar and Swiss are my favorites but you can go as bold as you want!
- Taste as you go. Taste your cheese sauce before you add your pasta. Is it bland? That can be because of the cheese you used or even the kind of salt you seasoned with. If it doesn’t have enough flavor, add a pinch more salt, stir it in and taste it again until it suits you.
- Feel free to add more pasta if you want to. Some people say that this recipe doesn’t have enough noodles in it, but I’ve never had that problem. And yes, you should cook your pasta before adding it to the cheese sauce.
Try a dash of vinegar for more zing
Because of the fat in the dairy, mac and cheese often needs some acid to bring the flavors to life. I love adding 1-2 teaspoons of red wine vinegar to the sauce before stirring in the pasta. Avoid strong vinegars like apple cider or white distilled.
To measure the pasta: Please follow the volume instructions and measure your pasta dry in a measuring cup meant for dry items (not a liquid one). Small pastas like ditalini or little wagon wheels can go up to about 2 cups and be fine in the recipe, and large ones like bow tie or cellentani can as well. If you will stick to elbow pasta until you get the hang of things you’ll be better off.
To double, triple or quadruple: Simply multiply the recipe below (look for the 1x, 2x or 3x on the right side of the recipe to double or triple the ingredients). Then place it in a 9×13. The bake time should be close to the same. Just bake until the center is hot and the edges bubble.
Other macaroni and cheese recipes you’ll want to devour:
- Lobster mac and cheese
- Spicy baked macaroni and cheese
- Creamy ham and sage macaroni and cheese
- Three cheese stovetop ultra creamy mac and cheese
- The best baked macaroni and cheese with tomatoes
- Truly easy microwave easy mac and cheese
- Super Creamy gluten free mac and cheese
Baked Macaroni and Cheese
Ingredients
- 1 1/2 cups dry elbow macaroni shells or cavatappi
- 3 tablespoons butter or margarine
- 3 tablespoons all purpose flour
- 2 cups milk not skim
- 1/2 teaspoon each salt and pepper
- 2 cups shredded cheese I like 1 cup each of sharp cheddar and Swiss
Instructions
- Preheat oven to 350 degrees.
- Bring a pot of water to a boil; add a generous sprinkling of salt the pasta.
- While the pasta cooks, melt the butter in a skillet or pot large enough to hold the pasta when it’s done.
- Add the flour and stir over medium heat until the mixture is lightly browned; 1-2 minutes.
- Add the milk and whisk to remove any lumps and add the salt and pepper.
- Cook over medium-high heat until the sauce thickens and starts to bubble. About 6 minutes.
- Stir in the cheese and whisk until smooth and melted. Turn off the heat.
- When the pasta is almost done but still firm, drain it and add to the sauce.
- Stir the pasta into the sauce and bake in a greased 2 quart dish (or an 8×8 pan works pretty well) 20-25 minutes until browned and bubbly. You can also skip baking it if you want it super creamy and just put it under the broiler to brown the top (keep an eye on it) and then serve.


Really delicious. My first ever macaroni from scratch and i added broccoli. Five out of five!
I love that Danielle! I keep threatening to write a mac and cheese book that has as many variations as I can think up. Broccoli is a great start! I’m so glad you enjoyed it! –Rachel
If you choose to broil it instead of bake what temperature would you use and for how long?? I want the inside creamy but top crispy
Hey Gaby, for me broiling is just one temperature–on or off. Sometimes you’ll find a high or low setting and either will work. Just stick it in there about 4 inches from the heating element and stand there (don’t walk off) until you peek in and see the color you want on top. That might be 5 or 6 minutes but do keep an eye on it. –Rachel
Hi there! This recipe looks promising. I’m not much of an experienced cooker but this recipe seems simple enough. I’m excited to try to for Thanksgiving. Thanks for the recipe!
Well very good luck to you Eric. Just don’t get your sauce too hot–that’s the key. Stir it constantly over medium heat for the best results. You’ll love it! –Rachel
Does using block cheese cut up versus shredded cheese schange the texture in the bechamel sauce causing that gritty like texture ? Or is it just quality of cheese I noticed this as well but I have tried different cheeses each time I’ve made this
Hey Tanya, again, the gritty texture has me stumped. I hear this gritty thing often and I’m 99% sure at this point people means clumpy and not gritty as in eating sand…and my answer is always that you let your milk mixture get too hot and the béchamel split. You need to turn your heat down on your burner. “Medium” is very relative to the stove. My burners go from 10 to 1 and you’d think medium would be at 5, but for me it’s at 3. It should take 6 to 8 minutes for your sauce to begin to gently bubble. If you’re getting it there faster than that, the heat is too high. Remember also to always stir. Stopping for even 30 seconds is enough time to overheat the sauce (even if it isn’t bubbling yet) and it will split. –Rachel
WoW, I just made a double batch for my Son’s homecoming from college . It turned out perfect! This recipe is a keeper!
So glad to hear that Kathleen. It is delicious and I’m so glad you enjoyed it. And I’m glad your son is home. 🙂 Have a lovely Thanksgiving. –Rachel
Would there be a difference in texture if you cooked it a hair over? I cooked mine for 25 mins and I found it to be a little gritty. I don’t know if it was my cheese selection or something else. I also was wondering if it will taste any different if you heated it up again. I’m making another batch for a party and I want to make it the night before.
Hey Violet, I’m yet to figure out what this gritty issue is (people often describe it that way when they have a problem). I associate gritty with sand but I assume you mean lumpy or clumpy. That usually happens the béchamel sauce is overheated (butter, milk, and flour mixture). It may have actually split on the stove top and it just was not noticed it until you baked it up. Keep your heat turned to medium and stir constantly once the milk is added. Don’t rush it, and give it plenty of time to come to a bubble and thicken. 6 to 8 minutes is really normal for that. I’d say that’s what happened. Using bagged cheese can be an issue but I find that heat regulation is more often the problem for most of these cases. It won’t affect the flavor thank goodness but certainly looks odd.
And for reheating, you’ll really do better if you can wait and cook it before serving. You can make it the day before and just not bake it. Let it cool, cover it with plastic wrap and chill, then bake the next day and it will be a much better texture than if you baked it and served it the next day. –Rachel
This was great Mac & Cheese. I’ve used other, more complicated recipes in the past that add onion, sometimes pimento. This was so much better, definitely what I think of when I think of Mac & Cheese.
Just as an aside, my nephew makes Mac & Cheese for all his friends and always freezes it and it is still delicious. I just add some milk when I heat it up so it doesn’t get dry.
I’m so glad to hear that Rachel! (Love your name 😉 ) Thanks for the tip on freezing. I don’t think I’d recommend freezing this one because I think the sauce will split when it thaws but if someone wanted to give that a try, they are welcome. It won’t effect the flavor, just the texture. –Rachel
I made this and it was delicious before I put in the oven. However it became extremely dry after baked. Any suggestions?
Hey Kim, so a couple of thoughts on that. Of course the pasta is going to absorb the sauce as it cooks, so it’s not meant to stay as creamy as it is before you bake it…BUT if you’ll notice in the main blog post I do say that it’s fine to just turn on your broiler and broil the top so it’s golden and bubbly and not bake it if you prefer the texture that way. Maybe that’s what you’ll want to do next time. I think varying oven temperatures (they can vary as much as 50 degrees hotter or cooler than what your dial is set to) and thickness or thinness of your baking vessel can really effect how long it needs to bake. When in doubt, trust your eye and not the timer and take it out just when it starts to get brown if you bake your next one. Since there’s really nothing to “cook” you can easily broil next time and keep the texture. –Rachel
thanks for the tips! I think I’ll try just broiling it next time. I plan to make it for thanksgiving because it was a delicious and an easy recipe to follow. The kids loved it last time despite it being on the dry side, so it’s still a winner in our house either way!!
Glad to hear that Kim. Just keep tweaking until you get it how you like it. 5 or 6 minutes in the broiler and you should be ready to roll. Happy Thanksgiving!
I tried this today and my husband said this is the best Mac and cheese he has ever had in his life ! Thanks for sharing this recipe.
That is very high praise Celia! Sounds like you did an amazing job! Congratulations!!! –Rachel
will be trying this tonight, my first time making homemade mac & cheese! Wish me luck
I hope it went well Jena! –Rachel