
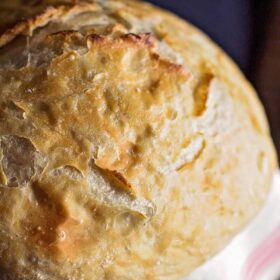
No knead dutch oven bread
No knead dutch oven bread is truly one of the most hands-off baking challenges you can try. If you’re new to bread making and want to make a loaf of something that is free from crazy preservatives and stabilizers this is a fun place to start . Smear a warm slice with butter or dip it in some olive oil and herbs for a special treat.
It feels like the most terrifying thing ever–making bread. I can’t tell you how many people I know who just won’t go near it for a lot of reasons:
It’s too hard.
It’s too scary.
It’s too time consuming.
But I will say that you can take it from this girl, who made her first loaf of bread when she was 9 and who has invested up to 26 HOURS in a batch of croissants (but only one time–good Lord that was enough of that) you can make this no knead dutch oven bread even if you don’t know your whisk from your spatula.
When I made this, I dumped the ingredients in a bowl, stirred it up and stood there.
Uhhhh…that was all I had to do besides walk away from it. For a day and a half! I thought something was wrong with the recipe.
But no. It’s true that the longer and slower this no knead dutch oven bread can “prove” if you’re British or “rise” if you’re not will result in a more flavorful loaf of bread. The longer the yeast has to sit and mingle with the flour and salt, the more robust its flavor.
And I know you want to put a flavorful loaf of bread on the table–nothing boring.
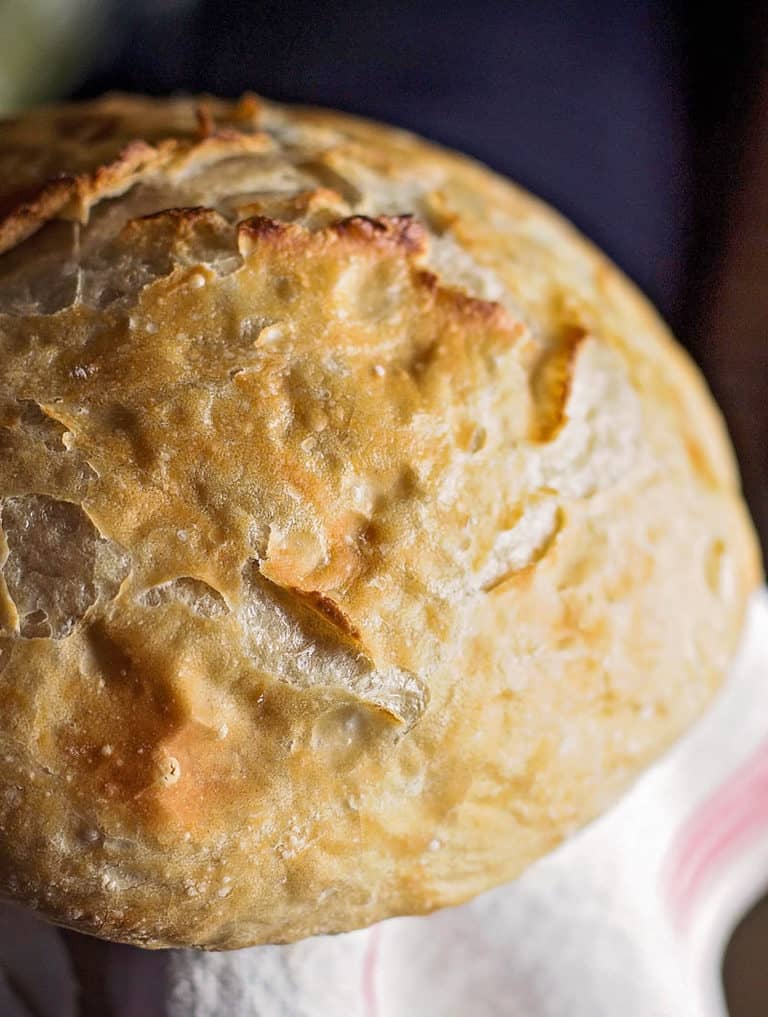
This bread looks almost identical to those fancy loaves you buy at the grocery store. In my Kroger those loaves are sitting on a shelf with a big sign that says “PLEASE USE THE TISSUE PAPER TO TOUCH THE BREAD.”
Before I buy a loaf I always wonder what nose-picking three year old had their hands on it before I did.
Or better yet, what nose-picking adult.
Block it out. Just block it out.
All the better to just make it at home.
Tips for the best dutch oven bread
- Use active dry yeast here. It comes in a three-pack strip in your baking aisle. You’ll find instant yeast and active dry. Both will possibly work but you really want ACTIVE DRY if you can get it.
- UPDATE: Even though we aren’t using a full packet of yeast in this recipe, I have run into some issues recently with yeast that is simply more aggressive than other brands. I have found that after the 12 to 18 hour resting time my dough is liquefied which means that the yeast has dissolved the gluten structure of the flour. Here’s a yeast brand that shouldn’t give you any problems.
- No need to buy bread flour for this–plain old all purpose will work. If you have bread flour on hand, I’d try it because I’m like that. But the first time through all purpose is fine.
- I’d recommend using sea salt here if you have it. I’m just a big supporter of its clean flavor. If you can’t get it, table salt is okay.
- Remember that even after the long rise this dough is quite wet. Work with it with flour on your hands but avoid putting a lot of extra flour in to the dough. That will keep the texture light.
- I used a 4-quart dutch oven because that’s what I have. If you have one a bit smaller, use that so your bread ends up taller. A bigger pot leaves room for the bread to spread out.
How to make Dutch oven bread step by step
What can I use if I don’t have a dutch oven?
A dutch oven is a heavy deep pot with a tight fitting lid. They hold heat in really well and in this case–they hold in the steam which is necessary for making the golden crust on your bread. I believe a dutch oven is a fundamental kitchen tool everyone should have.
If you don’t have one, you’d have to concoct some sort of air tight, oven safe contraption. You could do a deep pot and seal the crud out of it with aluminum foil…it may not be as crispy, but the flavor should still be there.
What could I add to my dutch oven bread for more flavor?
The sky is the limit! The first thing I think is cheese or whole roasted cloves of garlic. Yummmmm. Of course fresh herbs would also be great. Rosemary, olive oil, or a few tablespoons of my homemade ranch dressing mix would add some zing. If you add any of these ingredients in to your dough keep in mind that they can all slow down yeast development so if you need to let yours sit longer than 18 hours–even 20 to 24–it will be okay to do that.
Make a loaf of traditional loaf bread with this recipe.
This recipe is inspired by my friend Jo Cook’s version of crusty bread.
No knead dutch oven bread
Equipment
- Parchment paper for lining the dutch oven
Ingredients
- 3 cups all purpose flour
- 2 teaspoons flaked sea salt OR 1 3/4 teaspoons table salt
- 1 teaspoon active dry yeast
- 1 1/2 cups warm water
Instructions
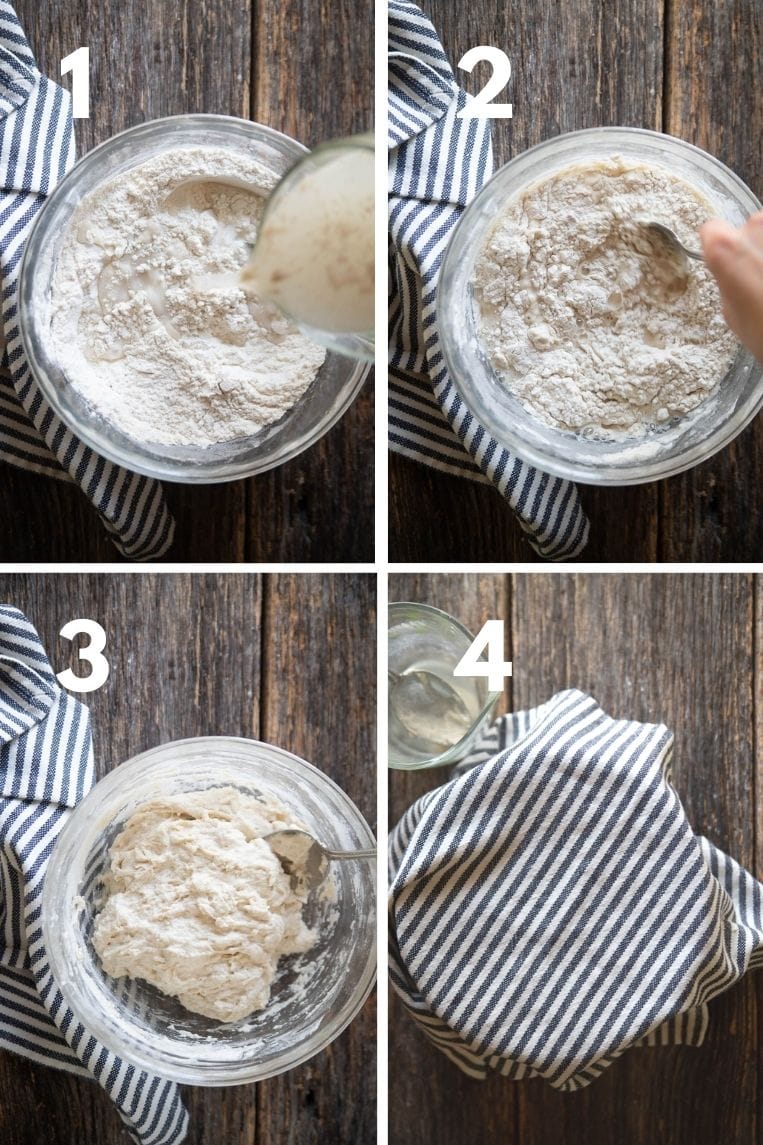
- In a large bowl, mix the flour and salt and stir to combine. Add the yeast and water to the flour and stir with a spoon until a sticky dough forms and no pockets of raw flour remain. (If you wanted to add cheese or herbs, do that here and stir them in.)
- Cover with plastic wrap and set aside for 18 to 24 hours. Until the dough more than doubles and has lots of tiny bubbles in it.
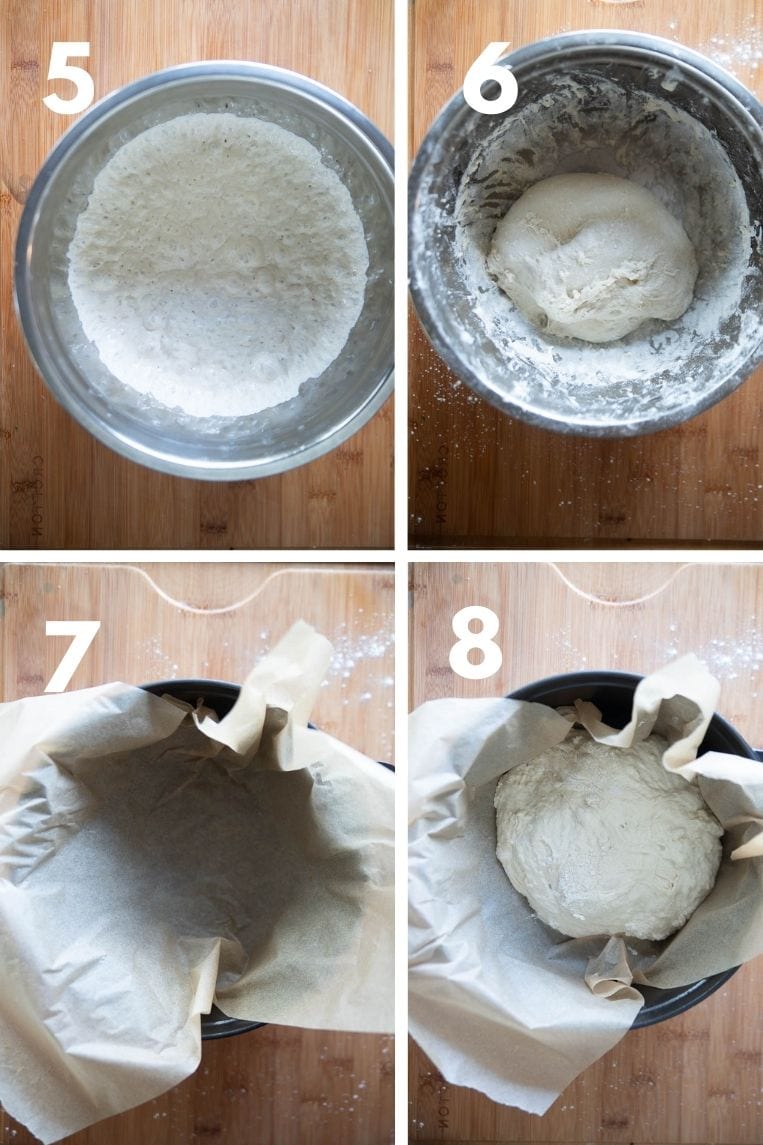
- When you're ready to bake, preheat the oven to 450 and put your 5 quart (or smaller) cast iron pot and the lid to heat up. Heat for 20 to 30 minutes.
- When the pot is ready, remove it from the oven and set aside. Sprinkle the dough with a tablespoon of flour or so and flour your hands well. Make a fist and punch right into the middle of the dough to flatten it. Then working gently, shape the dough into a ball. Flour your hands as needed, but avoid adding any more flour to the dough. It will still be sticky. That's okay. Transfer the dough ball onto a large square of parchment.
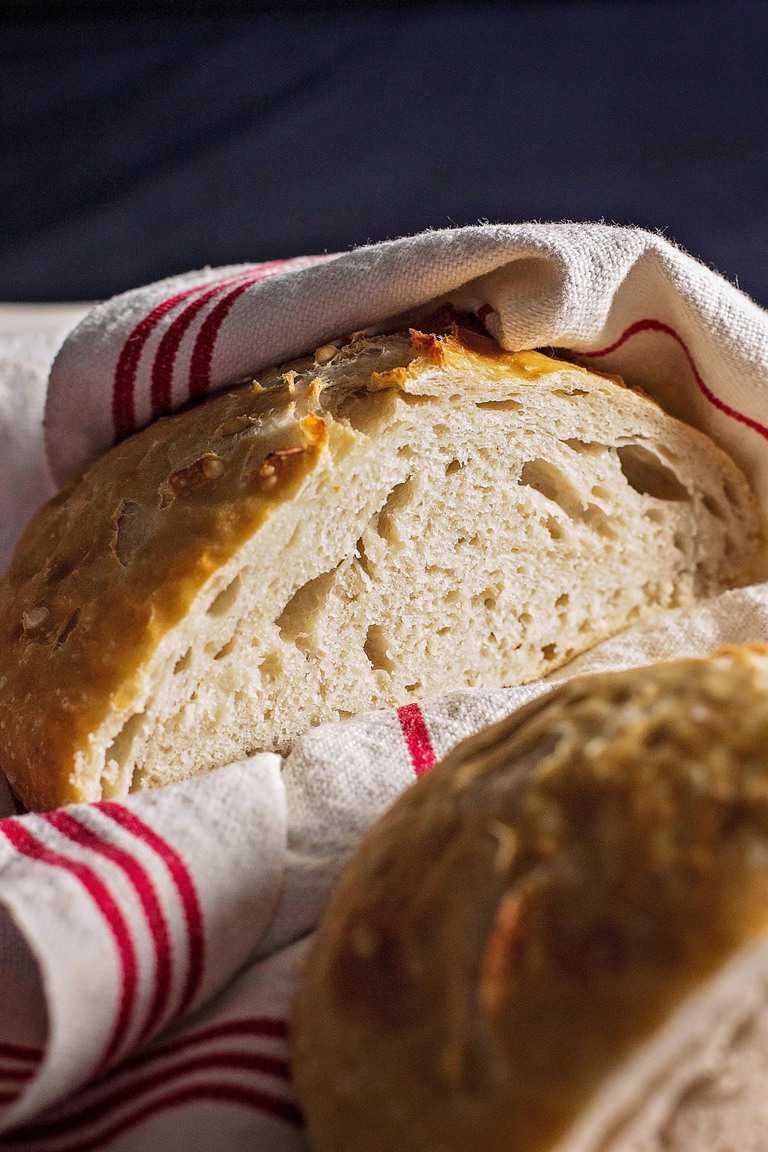
- Sprinkle another tablespoon of flour inside the bottom of your pot and then transfer the dough and parchment paper inside the hot pot. Cover with the lid and bake 30 minutes, then remove the lid and bake an additional ten. Transfer to a wire rack to cool.


I made this yesterday/today and it came out wonderful. Stirred it up at 10:30 last night and baked it at 2:30 today. Bottom of the loaf was just a little doughy. Not sure what that means? I used 2 c. all-purpose flour and 1 c. of bread flour.
Hey Lori, so by doughy do you mean it was actual unbaked dough (in which case you needed to tack a bit on to your bake time) or was it just dense at the bottom? Dense means your bread needed a bit longer to rise. Keep in mind that based on the temperature of your house, your bread may have needed a bit longer rise. Easy to fix on your next batch. –Rachel
Can it rise more than 24 hours. I want it for dinner tomorrow but made it too early and have to work tomorrow.
Hey Karin, That depends on a lot of factors but temperature in your house is most important. The longer the dough sits the more likely it is to break down the gluten and may make it liquify. Bread really is sensitive to time and not something that can be put off. –Rachel
If I decide to add cheese to the bread, is it still ok to be sitting out that long for the rise?
Hey Matthew, yes it will be fine. Do keep in mind that adding cheese adds weight and inhibits rise so your bread may not rise as much before baking. You could also just sprinkle cheese on top of the bread before putting it in the oven if you wanted to as well. –Rachel
I wanted this to work so badly! I followed this recipe exactly and it was an utter failure. I am a newbie bread maker but I’m very experienced in home baking in general and I felt right from the start that there wasn’t nearly enough flour. However the instructions said it would be wet and not to add a lot of extra flour so I went with what I had. It did rise and bubble up but it was runny and wouldn’t even begin to form a shape much less a ball. The result after baking wasn’t even edible. My yeast was fresh and the bubbles meant it was working, my measurements were correct, my pot was hot, I just can’t fathom what went wrong as clearly the recipe works for some. After coming here and looking at the comments, it looks like I had the exact same experience as Fabian, another commenter, did on their first time around. I too, live in a humid area, in the low country of South Carolina, but I don’t know if that is the problem since it’s December and temps were in the mid 60s today. I have browsed around and seen recipes with a full cup more of flour with the same liquid measurement so I will continue to experiment. I bought an enameled Dutch oven specifically to make this bread in so I’m determined to find success.
Hey Mattie,
When it comes to bread it doesn’t matter if you can make a perfect 12-layered wedding cake with one hand behind your back–it’s just different and requires a different set of skills entirely. As one reader said about another bread recipe I have “it’s an art form” and it really does take a lot of practice and instinct so don’t give up! Let’s work through this. If your dough was watery it likely did have the same problem Fabian had in that the yeast dissolved the gluten as it sat. That can certainly happen in areas that are super warm and humid (where yeast likes to thrive). You’ll note that he tried again and had good success with round two.
Keep in mind also that humidity/moisture is absorbed into your flour. If you live in a humid area it’s totally possible that you won’t need the same amount of water that another person in a drier climate needs. Start with 3/4 of the amount called for and see what happens then let it sit for less time–just until doubled. There’s no way that any bread recipe you’ll find online or in any cookbook can be followed ver batim because of unique environmental factors that are unique to each kitchen. Just try it again–I know the recipe works because I’ve obviously tested it. You just need to get it work for you. Reduce that liquid and the rise time and see what happens. –Rachel
I’ve been looking for the recipe for a while and although I was able to find it as a narrative, no luck finding just the recipe. In the past I’ve made this a number of times and if there is a problem, it’s that the loaf never lasts very long. It’s always delicious.
Thanks – on my way to repeat the process.
Meant to ask, can I use my stand mixer to do all the hard work?
You can, but I don’t think it’s necessary. You can mix everything in a bowl so quickly I don’t see the need in getting out the mixer but that’s up to you Bob! –Rachel
Hi ? Racheal OMG….I really want to try this bread looks and sounds so yummy. But I do have a question… Would I need to tweak the recipe due to me living in Wyoming and the elevation is 4500. Do you have any recommendations on adding more or less from the recipe? Please HELP IF YOU CAN I WANNA MAKE THIS TOMORROW IF POSSIBLE.. The reason I ask it that I’ve tried to make bread but I always fail and it’s just way to hard??. Thank you in advance for your help and time. ?A extra thank you for sharing this easy recipe. Hope to hear from you soon.
Sonya
Hey Sonya, you’ll need to make plenty of adjustments. I’m not a pro at high altitude baking so check out this post: https://www.wheatmontana.com/content/high-altitude-baking-how-make-your-recipes-work-mountains It has all the details! You can do it! –Rachel
Hello, Rachel. Thanks for this recipe!. I have tried it a couple of times and this was my experience:
First one: I had the dough rising for about 12 hours. Lots of bubbles, good volume, but it decreased maybe from hour 10 to 12. The dough was sticky ( as I read it should ) but it was also very runny. It was not possible to work it in any way. My final loaf was a very dense one. Not good at all. ( well, my fiend told me it tasted like beer, so I guess that is not and awful thing LOL )
Second one: I thought that maybe the temperature and humidity of my kitchen was too high ( I live in Cancun, Mexico. so, hot and humid, oh! and sea level ) I decreased the rising time to about 3 hours ( not just randomly; I waited for the dough to double it´s size and get lots of bubbles as the recipe indicates ). It was still sticky and a little bit less runny. I was not able to shape it like a round dough ball but it rested pretty nice in the dutch oven. ( Lodge cast iron )
My final loaf was not horrible looking and it was not a dense brick like the first one. It had some air bubble holes on the top part of the loaf but the bottom was much denser. The crust was good ( I think ), the color was like the yellow a bisquet will have ( the ones with egg wash ). Maybe it could be a little more brown. As for the inside oft he bread, it is a little rubbery but with good flavor. Also, the crust was shinny. I don’t know if that is good or bad, as I have seen artisan breads on stores and they are opaque ( I think ) . Now, this is day 2 and the whole bread is a bit rubbery. The bottom of the bread has a pretty nice crust, crunchy and with wood brown color.
Thanks for reading, any advice will be largely appreciated!
PS. My apologies for my english 🙂
Hey Fabian, your English is just fine. Let’s see if I can help you. There are a few challenges here because I would assume your ingredients may vary from what we use here in the U.S. to some degree. Here are my thoughts:
1) Make sure your dutch oven is really well heated. If your second loaf had a dense bottom that makes me think it didn’t hit a pot that was hot enough to make it rise as it should have. If you can double check your oven’s temperature with a separate thermometer that may help. Make sure that your 450 is actually 450.
2) The inside texture will be a bit rubbery. It’s not nearly as pillowy and soft as a regular bread would be. That’s okay and your description of it sounds fine. The crust gets a bit shiny because of the steam inside the pot when it bakes. That’s also fine. 🙂
3) Your bread won’t last much past two days on the counter thanks to the fact that it isn’t filled with preservatives and stabilizers like store bought versions can be.
I’d suggest verifying your oven is hot enough and then as long as you don’t burn the bottom of your bread, giving it a few minutes longer in the oven. I think that will help most of your issues. Otherwise remember: bread baking is a practiced art and every loaf will vary in texture and flavor. The “beer” flavor came from the fermentation of the yeast–you were essentially making a sourdough! The acid from that sourdough destroyed the gluten and that’s why it became liquid. You’re certainly going to need to adjust that rise time for your humidity and heat level and I’d suggest only letting it rise until it doubles.
You’re doing great though! Keep at it and keep trying–you’ll make a great one!
–Rachel
Hello, Rachel. Thanks for your amazing response, everything makes complete sense.
I just did my third attempt and it worked out pretty well!
It had a really, really nice crust, some nice holes and a great flavor. It was less rubbery and, when sliced and heated on my little electric oven, it was just amazing! ( with some avocado and salt! ) I kept it sliced about 5 days on the fridge ( on a big ziplock ) and really enjoyed it.
I was definitely not heating my dutch oven for long enough. Now, the size of the final loaf is not that taller than the dough itself. Is this normal? or do you think I have to work more on my dough?
Thanks so much for your advice!!
It is normal, yes. When you put the bread into a hot appliance like that dutch oven yeast gives it’s last burst of life before the heat kills it and any rise stops. If your dutch oven is really hot, the yeast and any remaining rising power it has will be stopped even more quickly and you won’t get a ton more rise out of it. My loaves are usually about three or four inches tall at the most. Yours should be about that tall. –Rachel
Used this recipe with King Arthur AP flour in my Lodge cast iron oven… bread came out fabulous, wife loved it. Making another for mother in law now. Next one I will use Caputo 00 Rinforzato flour, sprinkling imported fresh grated parmigiano reggiano on top. I also have stone baked many Tuscan style no kneed loaves and mixed in some fresh ground peppercorn, or Italian herbs. I love the Dutch oven recipe now.
That sounds wonderful Kev!This is a great easy bread. I’m so glad you’re having fun with it. Here’s to many more delicious loaves! –Rachel
If I double the recipe how much more cooking time is required?
Hey Craig,
You know, with baking and bread it’s going to be iffy with doubling. Just because you can double it doesn’t mean you should–recipes have been known to fail when changing ratios of ingredients even if it seems logical to do so. If you want to try it, I’d lower the oven temperature by 25 degrees and I’d estimate you’d want to bake it 55-60 minutes, but that’s a guess. You don’t want to burn the outside and still have a raw center. Very good luck to you!–Rachel
my pot says 400 is max temperature can I leave it at 400 and just cook it longer?
Is it real, solid cast iron? If it is a good quality one (if not you should get a good one!) it should go beyond 400 easily but yes, feel free to add a bit to the baking time. I can’t tell you how much time per se, but maybe another 8 to 10 minutes? Good luck Mike! –Rachel