
Easy Yeast Rolls
Just a dozen easy yeast rolls? You got it. No more, no less, and all the easy steps you need to make light, airy rolls anytime you need them.
This recipe was originally published in March, 2014
Yeast rolls seem like they terrify way too many people. Are you one of them? Or maybe you’ve been searching for the softest, most flavorful easy yeast rolls that don’t make a blue ton or use 3 pounds of flour to put together.
You just need 12!
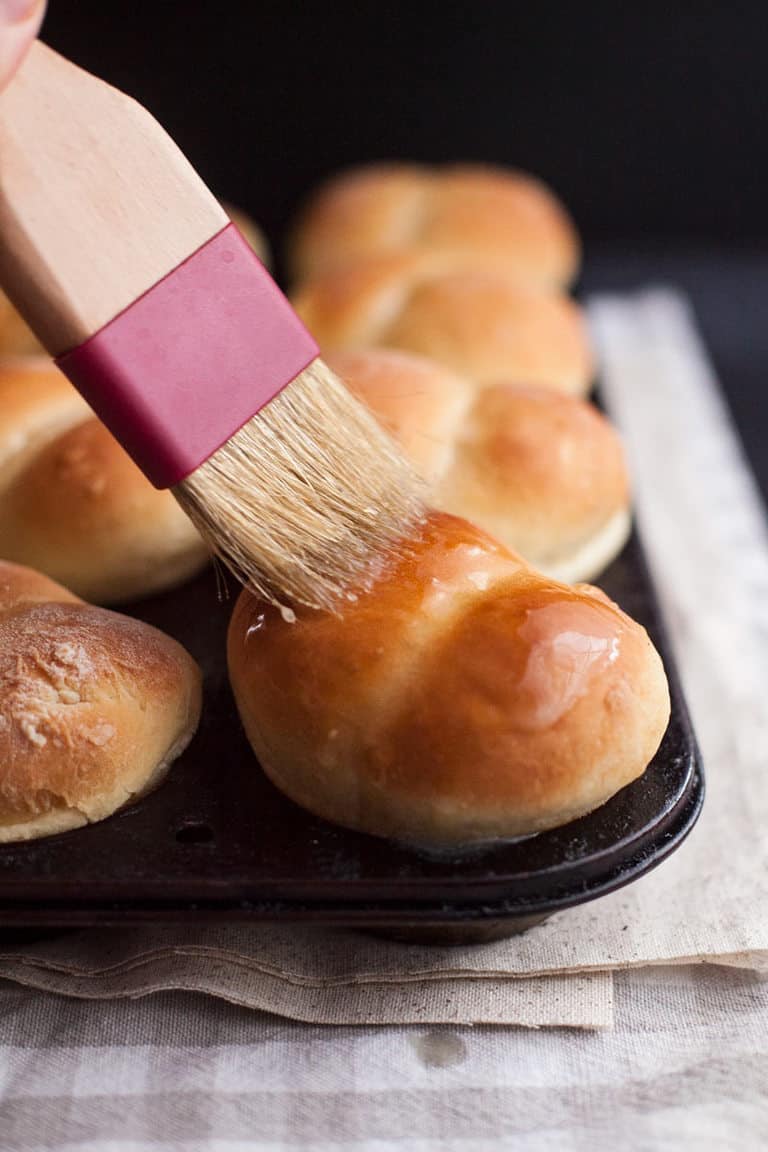
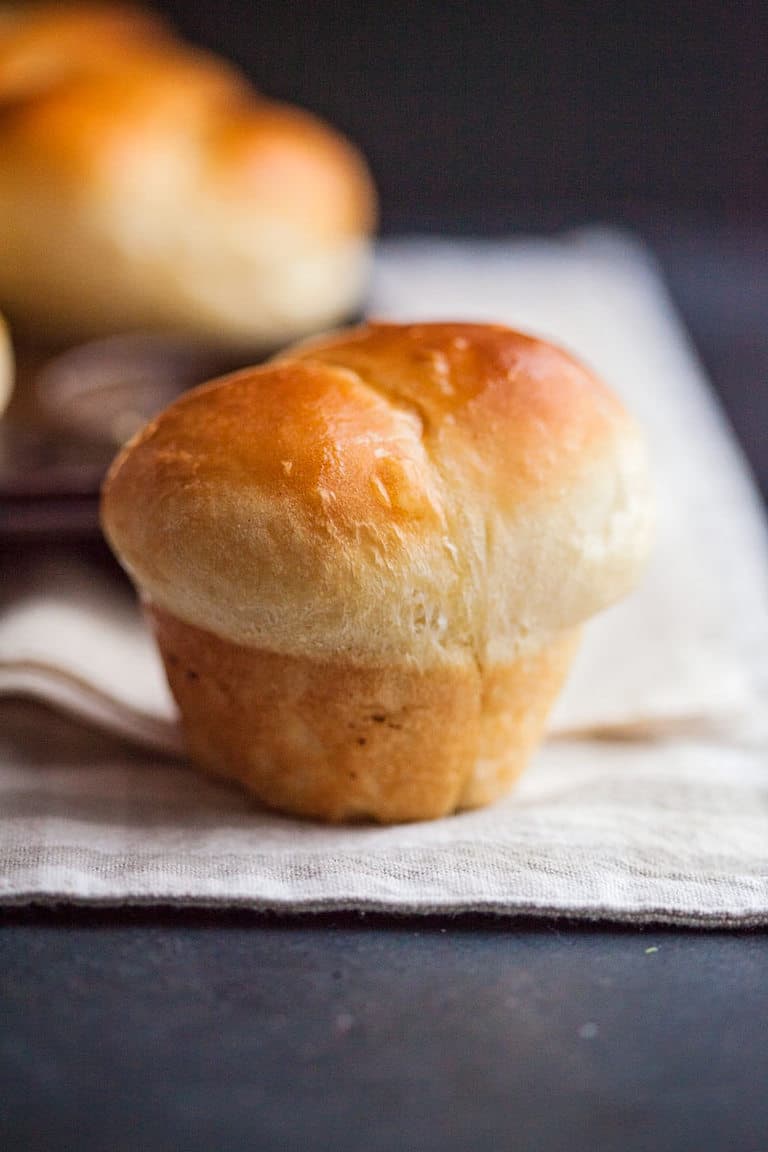
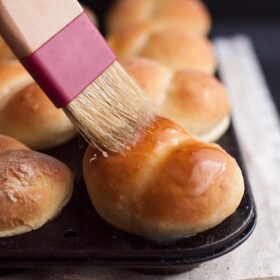
No matter what your situation, these easy yeast rolls will do it. This version is made by rolling two balls of dough about 2 inches in diameter and putting them side by side in a muffin tin to rise. That’s how you get the split down the middle. We called these butt rolls growing up. You can see why obviously.
If you don’t want to roll balls, just put them in the muffin tin in one larger ball or place them in a round cake pan barely touching–that’s another easy way to get your easy yeast rolls done with less fuss.
They’ll emerge from the oven so soft, warm and begging for a smear of butter and jam.
How to make these easy yeast rolls
- You’ll have to tackle yeast. Yes, I know. But you can do it. If you need some help, check out my post on how to activate yeast. It takes about 5 minutes. You can handle it. You can also watch me activate yeast on YouTube.
- Over the years I’ve tried a lot of flours–and a lot of brands of flours–to find one that works best. I actually find that the cheaper the flour is, the better it works, resulting in a lighter dough. If you want to use just all purpose flour, my favorites are King Arthur, Aldi’s flour or Hogsdon Mills from Walmart. I do not recommend Pillsbury or Gold Medal by any stretch.
- Bread flour is also excellent here and something that I really just started using in the last year and a half or so. I really like it here–it has more gluten in it and gives your dough more structure as it rises and I think the the yeast rolls are lighter. I like King Arthur for bread flour. You could also do half all purpose and half bread flour if you wanted to go that route.
- Avoid working too much flour into your dough when you knead it on the counter. A little stickiness won’t hurt anything. Keep your hands floured and avoid dumping it on the dough itself.
- If you want a stronger yeast flavor in your dough, let it rise in a cooler area for longer–the yeast will develop more fully and give you that signature flavor.
The difference between active dry yeast and instant yeast and how to swap them
There have been tons of questions about the difference is between active dry and instant yeast. This recipe calls for active dry yeast which needs to be activated in warm water before using it. I use active dry yeast because it was the standard type of yeast developed before instant and most time trusted recipes are written for that type–but one isn’t necessarily better or worse than the other.
Instant yeast can be activated in water OR it can be added dry right into the flour or dry ingredients and then added to your recipe. Instant yeast does not rise faster than active dry despite the “fast rise” on the package.
If you only have instant yeast on hand
If you only have instant/rapid rise yeast on hand, add the water (warm) that’s used in the recipe in with the eggs and oil. Then open the package of yeast and add it into the flour before adding it to the recipe and proceed as the recipe instructs.
Remember: Instant yeast can still fail
Just because you don’t have to activate instant yeast doesn’t mean it will just automatically rise. Your water must still be the correct temperature (luke warm) and your other ingredients needs to be room temperature as well. Too cold and the yeast still won’t wake up and leaven your rolls.
Not looking to work with yeast? Try my no-yeast quick rolls and give either version a big smear of my slow cooker apple butter.
How to develop a stronger yeast flavor
Yeast doughs develop flavor while they rise. The longer the rise, the more yeasty flavor that will develop. In order to do this, rise your dough in a cool location.
70-80 degree rooms will produce a doubled dough in 1 to 2 hours but to boost flavor, try moving your dough to a cooler part of your house or even a garage or closet that’s about 60 degrees until it doubles in size.
You can rise the dough in the refrigerator but only until it’s doubled–3 to 4 hours.
Can I rise the dough all night in the refrigerator?
Not in this case. I’ve tried it and the yeast amount is too aggressive for a long slow rise resulting in the digestion of all of the gluten in the flour. When morning comes you have a soup of sloppy dough you’ll have to throw out.
If you want to do an overnight or refrigerator roll, you’ll need a recipe written specifically for that process.
Watch me make these rolls on YouTube
Get instructions for this recipe as a loaf of bread here.
How to make these rolls ahead
Freeze them unbaked
The best way to make these ahead is to do the first rise, shape the dough, then freeze the dough balls on a cookie sheet or in the baking pan you want to bake in.
When you want to bake, remove from the freezer, place the dough balls in a greased muffin tin (if you didn’t freeze them in it) and cover with greased plastic wrap. Let the dough rise until doubled which will take 6 to 12 hours then bake.
Freeze them already baked
You can also bake the rolls and freeze them in an air tight container then wrap them in foil and reheat in a low oven for 10 to 12 minutes.
Homemade Yeast Rolls
Ingredients
- 1 cup water about 110 degrees or just slightly warmer than lukewarm
- 1 package active dry yeast *see note 1 for using instant yeast instead
- 3 tablespoons granulated sugar
- 2 tablespoons flavorless oil I prefer avocado but vegetable or canola also works
- 1 egg at room temperature
- 3/4 teaspoons salt
- 3-3 1/2 cups all purpose flour
Instructions
- In a large bowl, dissolve the yeast in the warm water.
- Add the sugar, oil, egg, salt, and half of the flour and mix until just combined.
- Add one more cup of flour and mix until the flour is combined again.
- Add between 1/2 of a cup to 1 whole cup of the remaining flour as needed until the dough comes together and is soft but not gooey. (Usually takes about 3/4 of a cup for me, but will depend on weather and humidity)
- Spray the top with cooking spray and cover with plastic wrap.
- Allow to rise in a warm place for one hour or until doubled.
- Turn dough out onto a floured surface and knead 4 or 5 times until the dough is slightly smooth.
- Spray muffin tin with cooking spray.
- Pinch off balls of dough about 1 1/2 inches in diameter and place two in each muffin tin side by side.
- Allow to rise about one hour more until doubled again.
- Bake at 400 for 12-15 minutes and brush melted butter over the tops when you take them out of the oven.


Love these rolls.
If I wanted to use whole wheat flour, what would the measurements be?
Thank you
What is the quantity of yeast? Grams? Tablespoons? Thanks
Pam if you are in the US packets of yeast are 2 1/4 teaspoons or 4 grams. Your recipe will tell you how much to use. –Rachel
Rachel you are amazing! You taught this California working mom how to bake and I love you for it. I was put on an unexpected Covid-cation from work and didn’t know what to do with myself. I’ve never had the patience for baking and am always so envious of my best friend who I’ve nicknamed “Martha Stewart”. I stumbled upon your “easy bread video” and thought “Why not I got nothing but time and if nothing else I’ll get a good laugh out of it!”. I was so impressed with how easy (and stress free) you made things. I loved how you explained things and helped to troubleshoot. My first loaf of bread was amazing and I was hooked! I have used this recipe as a base for all kinds of things and am most proud of my cinnamon rolls. In my whole life I’ve never made it through a 5 lb bag of flour (legit had one in the freezer from at least 10 years ago). Well I am proud to say I’m on my second 10lb bag in 2 months. Thank you Rachel Ballard for all that you do. I am a fan for life!! <3
KAREN!!! You are the star here–not me! You took the initiative and tried and that’s wonderful. I am so so proud of you! Welcome to the Feast and Farm family!! –Rachel
I am always hesitant taking on yeast rolls. This recipe is concise, easy to follow. I used half King Arthur whole grain flour and white. It rose nicely and I’m waiting to see if it does again in roll pan. Thanks!
Good recipe. No brown inside for me. Next time I’ll use a little more salt. The dough handled very well. Bulk rise was super fast. I may try to slow that down by mixing all ingredients cold, no warm water. A longer bulk proof would develop more flavor.
I made this but used it to make bread. My question is why did my bread come our more of a brown on the inside. Tastes very good just not white bread. Thanks and love your videos.
Well that’s really interesting John. Did you use a traditional all purpose flour? Was it a white whole wheat? Or anything different? I can’t think of any reason the actual inside of your bread would be brown. Unless of course , you were using a whole wheat or brown flour. –Rachel
@Rachel Ballard, Thanks no I used white all purpose flour the first time and white bread flour the second. Both where brown on the inside…I was thinking maybe to much yeast or maybe to much oil. Gonna lighten them both by a quarter and see if that helps.
John can you email me a picture? rachel@feastandfarm.com I guess you realize that no bread is neon white when made at home? Store bought bread is bleached and uses loads of preservatives and dough conditioners. That said, my breads aren’t ever truly brown–maybe off white would be a good description? The yeast and oil aren’t the issue. Just send me a picture of your ingredients and the finished bread. –Rachel
My wife and I just got married in June and I recently tried this recipe on her. She LOVES it! It boosted my confidence in the kitchen and she was so proud! I made it a second time tonight and it turned out great again. I’m praying this cycle continues, we hope to make it once every other week! Thanks for sharing your recipe and hope that you and your family have a great Christmas.
Way to go Timothy! I will say that bread baking is a very practice skill, so the more you do it the better you’ll get at it. Just keep going! –Rachel
thank you so much this covid stuff has got me really down so i bake to feel better and i have used your bread, cinnamon roll recipe and i was wondering if you can send me your Christmas recipes that would be great, your you tube page has a lot was wondering if you had anything knew, also your pie crust recipe is what i will be using for my apple pie,
Oh how wonderful Katie! You can find a whole holiday list here:https://feastandfarm.com/category/holiday-recipes/
My most recent YouTube video is the apple hand pies but there hasn’t been anything new in a while–hopefully I’ll be back soon! –Rachel
well you are right mine does not look like tours. this is my first time trying bread so……
I’m waiting for it to raise so I wanted to know if there is anything special to turn this into cinnamon rolls. this covid stuff got me board so I’m trying my hand at bread and if it goes south the birds might like it. thanks bob
Just roll out and spread with butter, cinnamon and sugar before the second rise Robert. You’ll be good to go.
I made these for Thanksgiving this year, my first attempt at yeast rolls! I was super jazzed about how they turned out, almost exactly like my Memaw’s! She always put three little balls of dough in the tins, instead of two. I did two. I’ve discovered through your recipe that bread baking may be my thing. It was so relaxing! Thanks for the recipe! I’m going to try cinnamon rolls next! Happy Holidays! ??
Brandy I’m so glad! Also–use my real cinnamon roll recipe! You’ll die they are so good!https://feastandfarm.com/soft-homemade-cinnamon-rolls/