
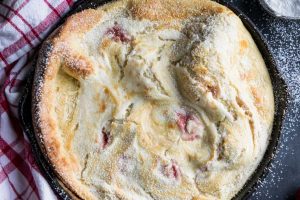
Easy Blackberry Cobbler
Easy blackberry cobbler isn’t rocket science–just a blend of berries, butter, and a soft, cake-like buttermilk batter for a southern dessert we all know how to eat, and eat well. Serve yours with ice cream and enjoy the flavors of any fruit you like. It’s easy to customize!
If you spend much time with a southern woman who knows how to cook, you’ve probably had what we call a “one cup cobbler”. The name is a little deceiving though–it doesn’t mean it makes a cup of cobbler but that it takes a cup of each ingredient.
It’s so simple it’s almost embarrassing and it tastes better than you can probably imagine just looking at it on screen.
What is cobbler?
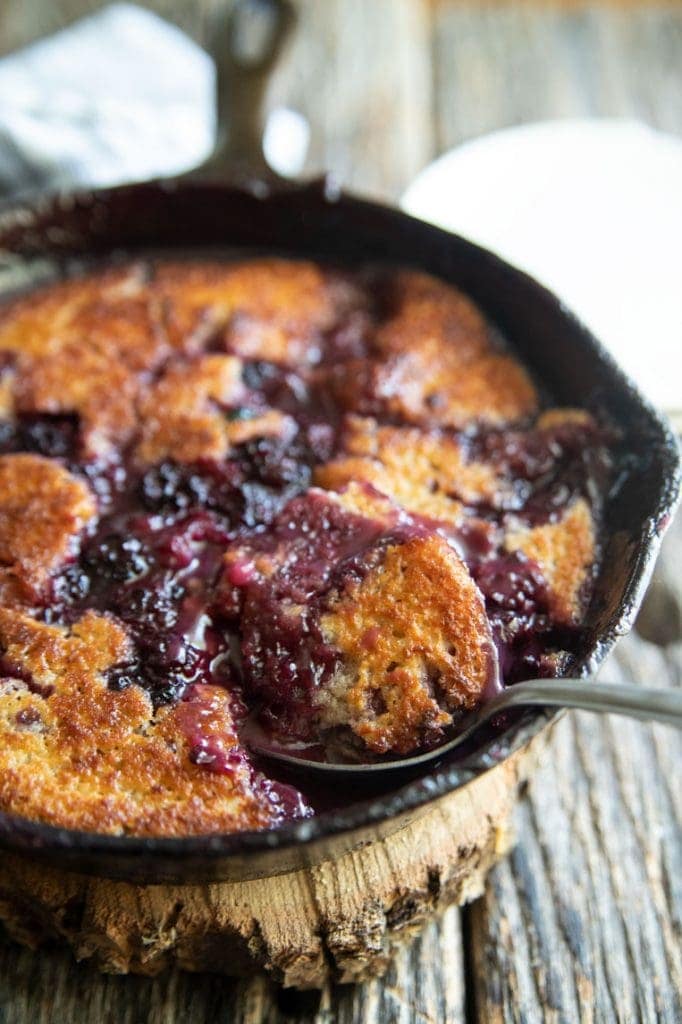
A cobbler is a fruit dish that’s topped with a batter, biscuit or dumpling before being baked. In this case, we use a batter that makes a golden, buttery, tender cake-like topping that floats above the cooked fruit. I have heard some sort of ugly rumors about people calling fruit covered with pie crust a cobbler–let’s skip that idea because this is my blog and I get to have the last say.
If you want to use a pie crust, call it pie like it is and move on (though I do recognize that LOTS of southern cobbler recipes have a top and bottom pie crust).
The secret to the most tender, golden, flavorful crust
After years of making this, I’ve discovered a little secret I’m going to let you in on: buttermilk.
Magic happens with buttermilk. It makes the most tender, tangy dough and I really prefer it over a plain milk version. If you don’t have any buttermilk it’s fine to use all 2% or whole or make a fill-in buttermilk with a recipe like this. It’s not the same flavor but it works in a pinch.
This recipe also calls for self rising flour. That’s a blend of flour, baking powder and salt together in a bag. If you don’t have self rising flour you can make your own.
Can frozen blackberries work here?
100% yes. I use frozen ones I grow, but any frozen ones work because they get cooked down anyway.
Can I use another fruit besides blackberries?
This is also a great base for any other fruit cobbler. If you are using a sweet fruit–like peaches–feel free to reduce the amount of sugar by 1/4 cup or more depending on sweetness. I love this recipe with pitted sour cherries too. So good!
Tips for making the “sauce” of your cobbler
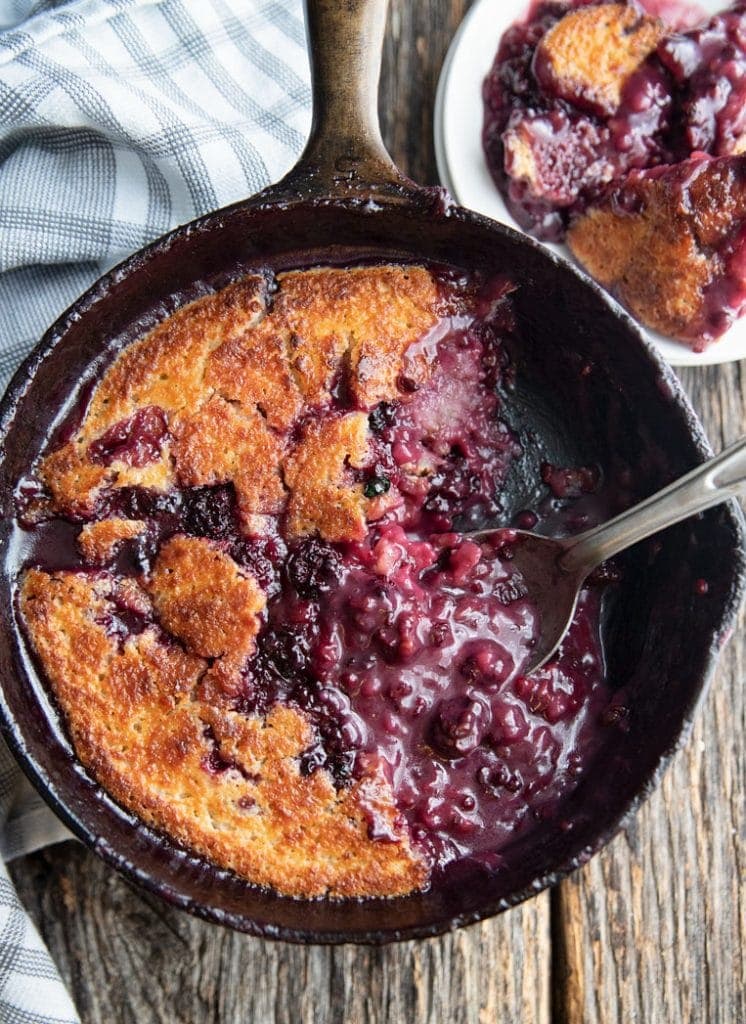
This recipe is what we call “self saucing” because you pour in butter, then batter, then berries and the water they cooked in then the whole thing bakes, the cake comes to the top, the berries sink beneath and the flour in the batter thickens the berry water into a sauce. It’s magic.
If you want your sauce thinner: add more or all of the water you used from simmering your berries.
If you want your sauce thicker and the whole cobbler more cake-like: add less water from simmering your berries (leave behind 1/3 of it or so).
Should blackberry cobbler be refrigerated?
Serve your cobbler warm or room temperature, but when you’re done yes, go ahead and refrigerate it. I cover mine in plastic wrap. Blackberry cobbler will last 3 or 4 days in the fridge.
One-Cup Blackberry Cobbler
Ingredients
- 1 stick butter melted
- 1 cup self rising flour
- 1 cup sugar
- 1/2 cup 2% or whole milk or 3/4 cup if you are omitting the buttermilk
- 1/4 cup buttermilk
- 1 quart fresh or frozen blackberries 4 cups (2 14-ounce bags frozen berries)
- 3/4 cup sugar
- Enough water to cover berries about 2-3 cups
Instructions
- Preheat your oven to 350.
- Place your berries in a medium sauce pan and add just enough water to almost cover them. About 2 cups or so.
- Place the pot over medium high heat and bring to a boil.
- Add 3/4 cup sugar and stir to dissolve. Turn off the heat and set aside.
- In a 10" cast iron skillet, or 9x9 baking dish, pour in the melted butter. Set aside.
- In a medium bowl mix the self rising flour and sugar. Add the milks and stir well. Batter should be slightly thicker than pancake batter.
- Pour the batter evenly over the melted butter. DO NOT stir.
- Next use a slotted spoons to sprinkle the hot berries over the batter. Pour over about 2 cups of the remaining water from the berries. Use less water for a more cake-like cobbler and all of the water for a more saucy cobbler.
- Bake 20-25 minutes until the dough is golden and the cobbler bubbles.


This is a great cobbler!
Waiting to see…it’s in the oven…looking good so far!
Well? How did it turn out for you Linda?
Hello! I made this recipe with blueberries. I followed the recipe, however when it came out of the oven, the whole thing is purple and too runny. When you said ” pour over the remaining water from the berries”, does that mean over the blueberries in the dish or discard the water? I’m afraid I added too much of the berry water. Please help!
Well drat Megan! Let’s see if we can break this down a bit. First, you know that any time a key ingredient is substituted for what I suggested, it’s subject to a little different final result, however I do make this same cobbler with both carries and peaches and it’s fine so I think the blueberries should have worked. The key in the recipe says to add enough water to “just barely cover the berries”. If you used 4 cups of berries,that should have been about 2 or so cups of water left by the time you finished cooking them.
And you’re right, you were supposed to melt the butter in the baking dish, add your batter on top of that. Sprinkle over your fruit, and then pour the water into the baking dish.This makes the liquid that the berries cook in. Some people love a very juicy, thin cobbler, and others like a thicker one. Now as for the blue, did you stir it? NEVER EVER STIR A COBBLER. That might have been part of the problem if you did that. Better add that to the information in the post!
I hope it tasted good anyway. And don’t give up–try it again. Add little less water if you want to and hopefully it will work next time. 🙂
I have this in the oven right now it’s baked for 25 minutes and it’s nowhere near done. I’m thinking it’s about double the 25 minutes by the way it looks.
Well Susan, if you used a different amount of liquid in your berries, or a smaller dish to bake it in, it could make it the dough thicker and take longer. I haven’t had to bake one longer than 25-30 minutes ever. It just goes until the entire top has some golden color to it as you see in the picture. Every oven cooks different too–but don’t worry. Just cook it until the center of the dough is set and you’ll be good to go.
Totally agree! Buttermilk changes everything! And yes, any Southern woman worth her salt as a good one cup cobbler up her sleeve! 🙂 Great post!
I mean–exactly Annie! It’s a classic. I hope I’m worth my salt–what about you?? Thanks for coming by!
So I’m basically drooling over here over this one-cup cobbler, and I have a quart of fresh blackberries in my fridge… and it’s taking all I can do not to whip this up this afternoon because, well, while I love cobbler, eating an entire pan of it on a Friday afternoon *might* not bode well for my weekend, haha.
I love that you’re growing so many things in your garden, and I hope they continue to look lovely! I’ve only got a few things growing this year — a few herbs, a lone Texas tomato plant (that the seller at the farmer’s market told me was basically unkillable… so far, I’m skeptical) and some zucchini. Hopefully, both our gardens will produce great things this summer!
Also? This is one of my favorite links shared during last week’s That’s Fresh Friday Link-Up! I’ll be sharing it at my site tonight as a feature, and I hope to see you participating again this week! Thanks for sharing, and keep up the great work!
Thank you Erin and thanks for sharing my recipe with your readers! I really want to focus on getting to know more bloggers and being able to return the love. I’ll be sure to drop by the link up tomorrow. 🙂
You’re welcome! I’m trying to focus on getting to know more bloggers who are doing something similar to me, so it’s always exciting to connect with someone who’s passionate about food and delicious recipes!
Can’t wait to see what you share for this week’s link-up, and I hope you have a fantastic Friday!
Yep I think we are in a very similar boat. I look forward to getting to know you better. Email me anytime you want to chat. 😉
Perfect! Thanks, Rachel! Same goes!
This is a bit unrelated to the actual recipe, so I hope you don’t mind. I live in the deep South, but I’m definitely a city-girl. My parents and my grandparents were city-folk too. This leaves me with an immense gap in my knowledge: I can’t sew, can, freeze, preserve, ferment, hoe, bail, sow/reap or any of the other things you talk about in a farmer’s life.
How does one go about learning all these “homesteading” skills? Do you like that term? 🙂 I just learned it and it’s hit a nerve with me…I’m craving what feels like lost knowledge but I don’t know how to go about learning anything. I only know city-people and in this particular situation, they are as worthless as I am. I’m not opposed to reading books, but a lot of this is going to require a hands-on approach for me.
See, I told you it was an unrelated question. I don’t expect you to respond with lots of details and take a bunch of your time, but if you could maybe share a couple of suggestions to get me going in the right direction, I’d sure appreciate it.
Thank you for your insights. And, thanks bunches for this delicious recipe…cooking is about the only thing I’ve made any progress with and this recipe definitely seems within my abilities!! Can’t wait to gobble it up!
Well goodness Deborah–sounds like you’re in a pickle, but I think there’s hope! Keep in mind that the things I do I was raised doing–I was helping with canning at 9 years old and just worked my way up from there. Just like you were raised with “all city people”, I was raised with “all country people”. If it makes you feel any better, I can’t cross a street that has more than two lanes (both ways) without needing a brown paper bag to breathe in. 😉 So we all lack in some area…
That said, if you want to learn “homesteading” ways–I call it country living–the only thing standing between it and you is you! I’d suggest first visiting or calling your county extension office. They will have information on canning, gardening, crops, etc. Start small with container tomatoes or plant herbs in your flower beds. Visit farmer’s markets and get to know the vendors because they will more than likely be able to teach you the skills you want. Do you have an elderly friend anywhere who you might be able to convince to teach you?
And of course, there’s always YouTube and lots of websites on these topics. You’re always welcome in Kentucky for a week on the farm with me–haha–but you’d run away screaming at the end! Keep me updated with your journey and feel free to email me through my contact page anytime!
All the best, Rachel
it looks delicious!
Hi Rachel – This looks so delicious, and I agree about buttermilk and magic! Can’t wait to try this, and I’m glad to hear your gardens are doing so well!
That looks utterly delcious!
Oh thanks so much Victoria! I hope you are well 🙂 I enjoyed eating more than my share of this once I was done with the pictures.