
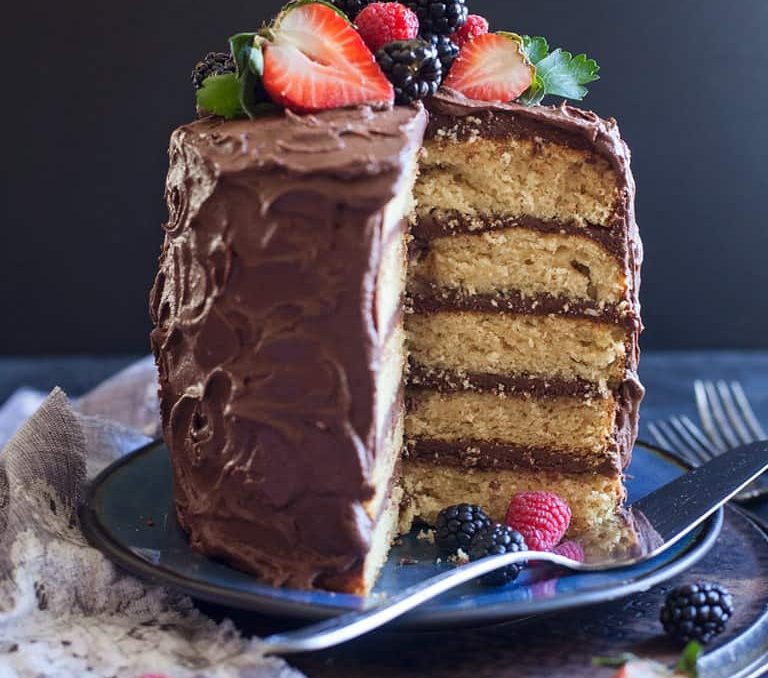
Gluten free chocolate cake (dairy free option)
Gluten free chocolate cake should be balanced but bold and as moist as possible. A true celebration cake, this decadent treat will pass any gluten eater’s test with flying colors. Dairy free options are included too.
Jump to Recipe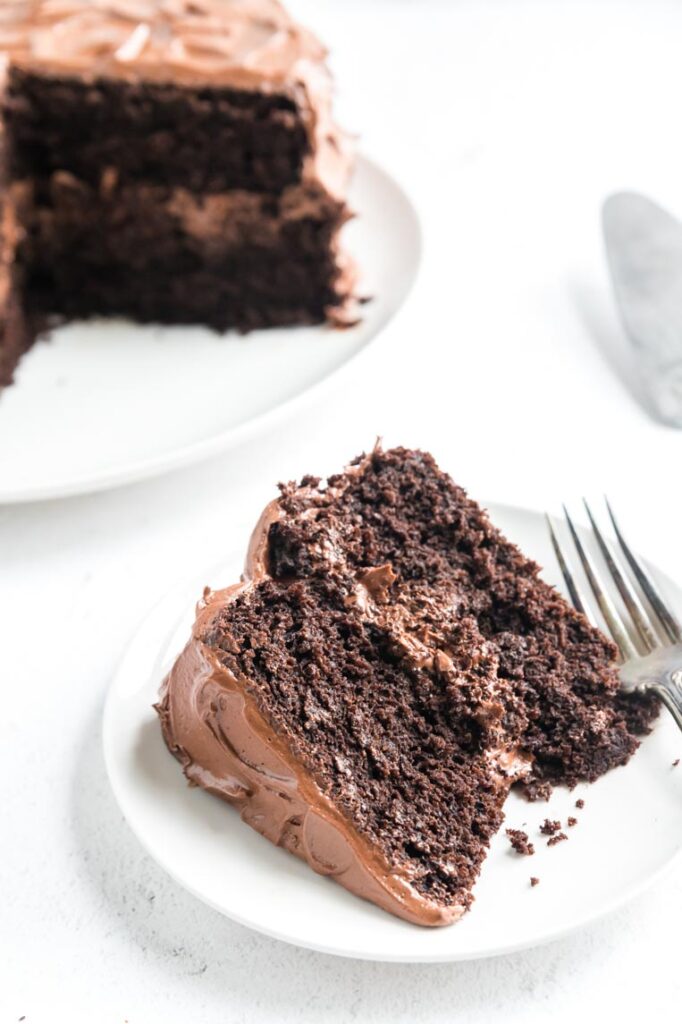
There’s nothing better than enjoying “normal” food, is there? It’s even better when a gluten free recipe is so delicious you can easily feed it to your gluten-eating friends and family without fear they will quietly push their plates away.
This gluten free chocolate cake is a great way to make everyone happier than a possum eatin’ a sweet potato.
Rich, decadent and a true celebration centerpiece–stick in a birthday candle or slice it up and smile when you take a bite.
The most important part: The flour blend
The key to the texture of this cake is the flour blend you’ll make and not over baking it. Both matter a ton here.
You’ll need:
The flour blend requires one specific ingredient you cannot substitute and get the final result pictured. I don’t often tell you that you have to have a specialty ingredient but this superfine brown rice flour is the golden ticket.
It ensures your cake is smooth instead of gritty. You’ll also need tapioca flour and potato starch but any brand works on those. I have them linked in the recipe as well.
These three items will make a LOT of cake or other gluten free baked items, so look at it as an investment in quality and your right to eat like everyone else for once.
What about xanthan gum?
We will use xanthan gum as a binder in our cake but I don’t add it to the main batch of flour blend. If you break the rules and are using a different flour, yours may have xanthan gum already added so make sure to check before you add more in the recipe.
Tips for the best gluten free chocolate cake (Must read!)
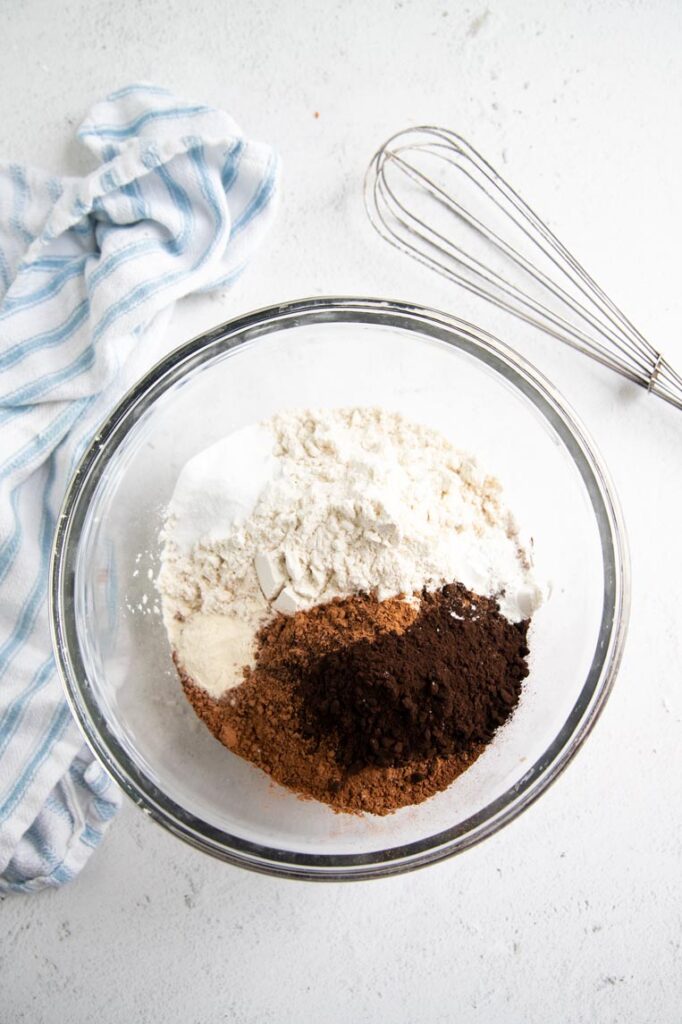
- Make sure to sift your gluten free flours together to ensure there are no lumps and everything is well mixed before measuring out your flour for the cake.
- Take time to grease and cocoa powder your pans really well. Gluten free cakes are sometimes more delicate and you don’t want it to break or stick. Parchment paper is a must in my book as well.
- Bake just until a toothpick is barely clean. Over baking will dry it out. Check your cakes 5 to 7 minutes early.
- Use your favorite cocoa but for the darkest color use a blend of black cocoa (linked in the recipe) and regular but don’t use black cocoa by itself. It’s too bitter.
- If you aren’t dairy free, I recommend real unsalted butter for the frosting. Many people hate the greasy coating of shortenings in their mouth and butter has a great flavor
- Know that as this cake cools further the frosting will set and be slightly firm. If you refrigerate it, it will be hard. It’s best at room temperature.
A note on sugar
No one needs to eat 2 1/2 cups of granulated sugar. I expect that you aren’t planning to eat this whole cake yourself but even so, be careful. To temper the white sugar, I used a blend of date sugar and organic cane sugar.
You could use all coconut sugar (it may add a different flavor to the cake), maple sugar (super expensive) or do a blend of the good and the bad like I did.
How to mix, bake and frost your chocolate cake
Step 1: Make sure your pans are greased, papered, greased again and dusted in cocoa powder.

Step 2: Combine the dry ingredients
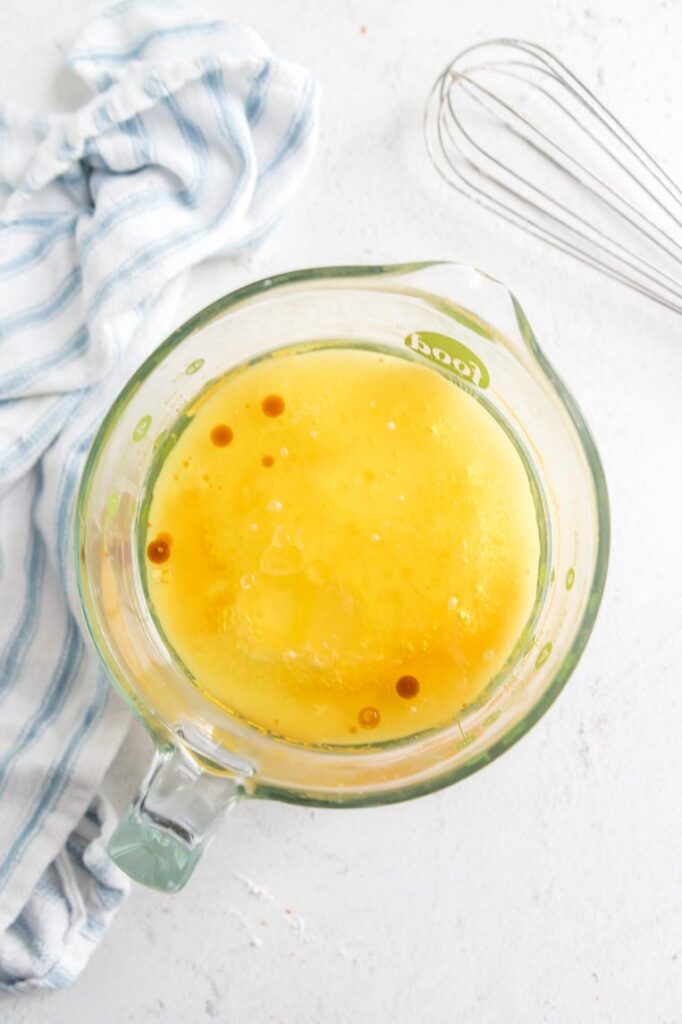
Step 3: Combine the wet ingredients
Step 4: Add wet to dry and mix until smooth

Step 5: Bake until toothpick has a crumb or two sticking to the toothpick, then cool completely.

Let’s make frosting
I’m 100% sure no one loves trying to scrape shortening off the roof of their mouth with their tongue after they eat frosting made with it. Gosh y’all that’s some nasty stuff.
In this gluten free chocolate cake we are going with unsalted butter for flavor and because we don’t use vegetable oil in any form (including shortening). If you are dead set on it though, it will work in this recipe.
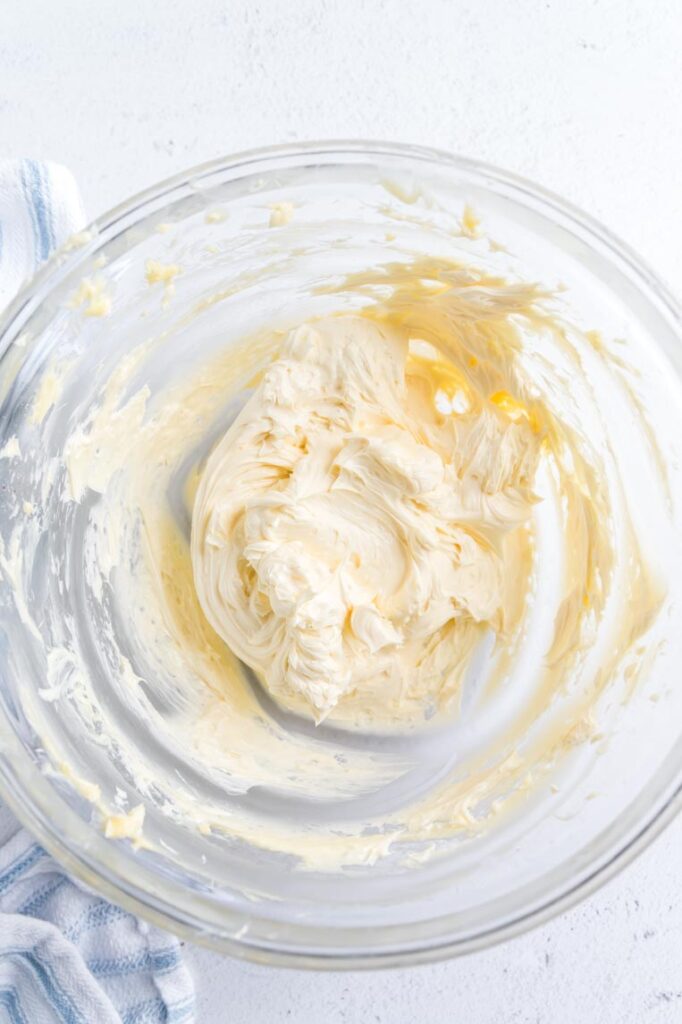
The key here is to make sure your butter is room temperature, and that you whip it until it goes from yellow until almost white which takes 5 to 7 minutes with a hand mixer.
Trust me and whip it the whole time.
Also make dead sure that your chocolate and cocoa are room temperature and not warm at ALL or you are going to melt the butter into a greasy mass. You’ll be mad at yourself.
Also note that this recipe does NOT have a pound of powdered sugar. Just 3/4 of a cup. Use good chocolate chips (I used Enjoy Life dark chocolate chips because they are only cocoa and sugar without additives).
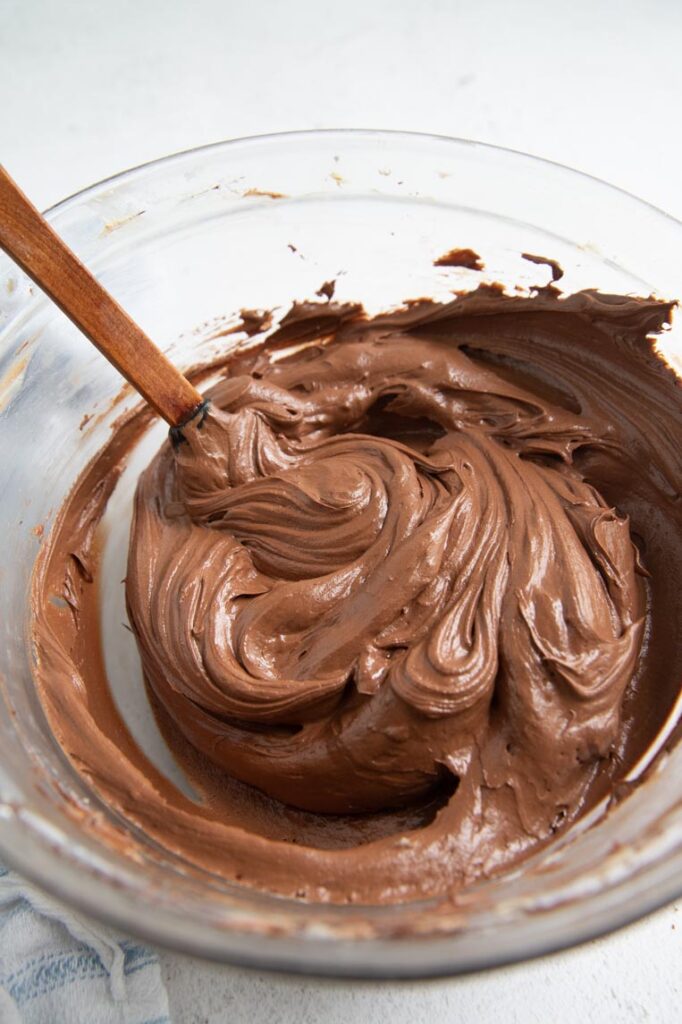
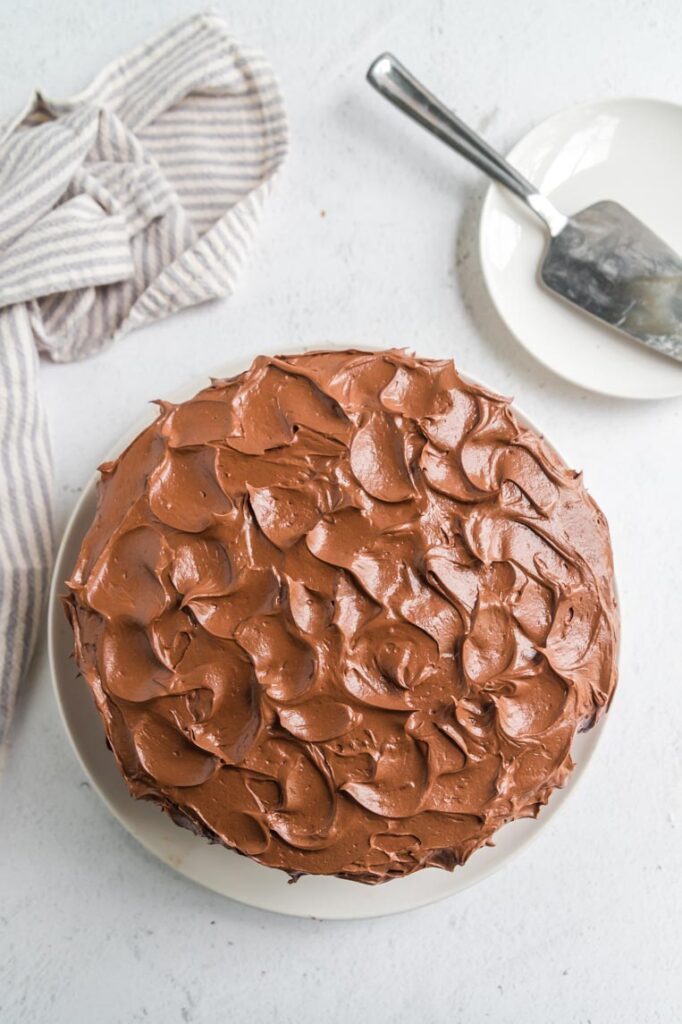
Your frosting will be gloriously shiny and easy to spread so make sure to put it on soon after making it. As it sets up, the frosting will firm a bit (or melt if it’s a super hot summer day) so plan accordingly.
If you put this cake in the fridge the frosting will be pretty hard, but soften if you give it some time to sit out before serving.
Need more cake?
Try my gluten free yellow cake. She’s a great one too.

Gluten Free Chocolate Cake
Ingredients
For the gluten free flour blend
- 2 cups Authentic Foods superfine brown rice flour do not substitute, see Note 1
- 3/4 cup plus 1 tablespoon potato starch not potato flour
- 1/3 cup tapioca flour
For the cake
- 2 1/2 cups gluten free flour blend (282 grams)
- 2 1/2 cups sugar (362 grams)I used 1 cup date sugar and 1 1/2 cups organic cane sugar, See Note 2
- 2 1/2 teaspoons baking soda
- 1 1/2 teaspoons baking powder
- 1 1/4 cups cocoa powder (94 grams)I used 1/2 cup black cocoa and 1 cup dutch cocoa, see Note 3
- 1 teaspoon xanthan gum
- 1 1/2 teaspoons salt
- 1 1/4 cups buttermilk (304 grams) almond milk with a dash of lemon juice may be substituted
- 1 1/4 cups warm water (300 grams)
- 1 large egg 2 small eggs works
- 1/2 cup avocado oil (134 grams) any flavorless oil works
- 2 teaspoons vanilla extract
For the frosting
- 1 1/2 cups dark chocolate chips (258 grams) I tested with Enjoy Life Chocolate Chips
- 1/4 cup boiling water (48 grams)
- 1/4 cup cocoa (22 grams)
- 1 cup unsalted butter, softened (224 grams) vegan butter or shortening may be substituted
- 3/4 cup powdered sugar (150 grams)
- 1 tablespoon milk almond milk works
- pinch salt
Instructions
Make the cake
- Preheat the oven to 350. Grease two round 8" or 9" cake pans with coconut oil or butter, or spray them with baking spray. Line the bottoms with parchment paper, grease again lightly and sprinkle with cocoa powder to coat the inside. Tap out the excess and set aside.
- In a large bowl, sift together the brown rice flour, potato starch and tapioca flour and make sure everything is well mixed. Measure out 2 1/2 cups of this mixture to use in the recipe and save the rest for another use.
- In a large bowl or in a stand mixer, add the flour blend you made, sugar, baking soda, baking powder, xanthan gum and salt. Whisk or mix together to combine.
- In a 4-cup measuring cup or a medium size bowl, measure in the buttermilk and water. Add the egg, oil and vanilla and whisk to break up the egg.
- Add the buttermilk mixture to the flour mixture and blend with a hand mixer, whisk or in your stand mixer until no lumps of flour remain.
- Divide the batter between the two pans and bake on the center rack, rotating half way through, until a toothpick comes out clean–25 to 30 minutes. Don't overbake your cakes or they will be dry. Start checking them 5 to 7 minutes before the end of the baking cycle. If you use 8" pans your cakes may take closer to 40 minutes to bake.
- Once baked, let cool in the pans 5 minutes then turn out on a wire rack to finish cooling completely.
Make the frosting
- Add the chocolate chips to a microwave safe bowl and heat in 30 second increments, stirring in between until the chocolate chips melt. About a minute and 30 seconds should do it. Set aside to cool completely.
- Mix the cocoa in the boiling water and stir to combine. It will thicken. Set aside to cool completely.
- In a medium bowl, beat the butter, sugar, milk and salt on high with a hand mixer or in a stand mixer until the sugar dissolves and the mixture becomes almost white and fluffy. About 7 minutes. No less.
- If the chocolate and cocoa mixtures are cool, add to the butter mixture and beat until everything is incorporated. If your chocolate is warm you'll melt the butter and ruin the frosting so make sure it's room temperature.
- Frost the cakes once they are room temperature. The frosting will firm as it sets and will be quite hard if refrigerated. Best if served the day it's made but will be delicious the next day as well.


About the Author
Rachel Ballard, RN, BSN brings more than 20 years of professional nursing expertise to Feast and Farm. With a love for nutrient dense foods that support wellness, she works to distill complex health information and current trends into recipes that fuel the best version of yourself. Read more about Rachel here.